
Almost all of the information and/or troubleshooting guides I've found online covers the newer Kwikee steps produced from roughly 2000 on. The information in this post covers much older units.
Description

I found a label on the right outside edge of the base plate mounted to floor of the motor home. Because it was right next to the wheel well it was not easy to get to. I ended up using my phone to take a picture just to read it. It's a model number on the sticker is 2834 which indicates that this is a 34 series step.
The control unit is mounted in the bottom of a cabinet inside the motor home near the door. It has a nice wiring diagram on the front. The part number for the control unit is 6020-050.
 |
| Controller Unit |
Inspection
The first step is to inspect the step for physical damage. Make sure none of the linkage bars are bent or broken and make sure the base plate is securely attached to the underside of the RV. Disconnect the pin connecting the motor to the steps and manually move the step through their full motion. Make sure there is no binding.Remove the motor assembly open and open up the gear case. Inspect the gear for missing or broken teeth. This seems to be a common problem. If the teeth on the gear are broken you may be able to turn it 180 degrees so the broken teeth are not used.
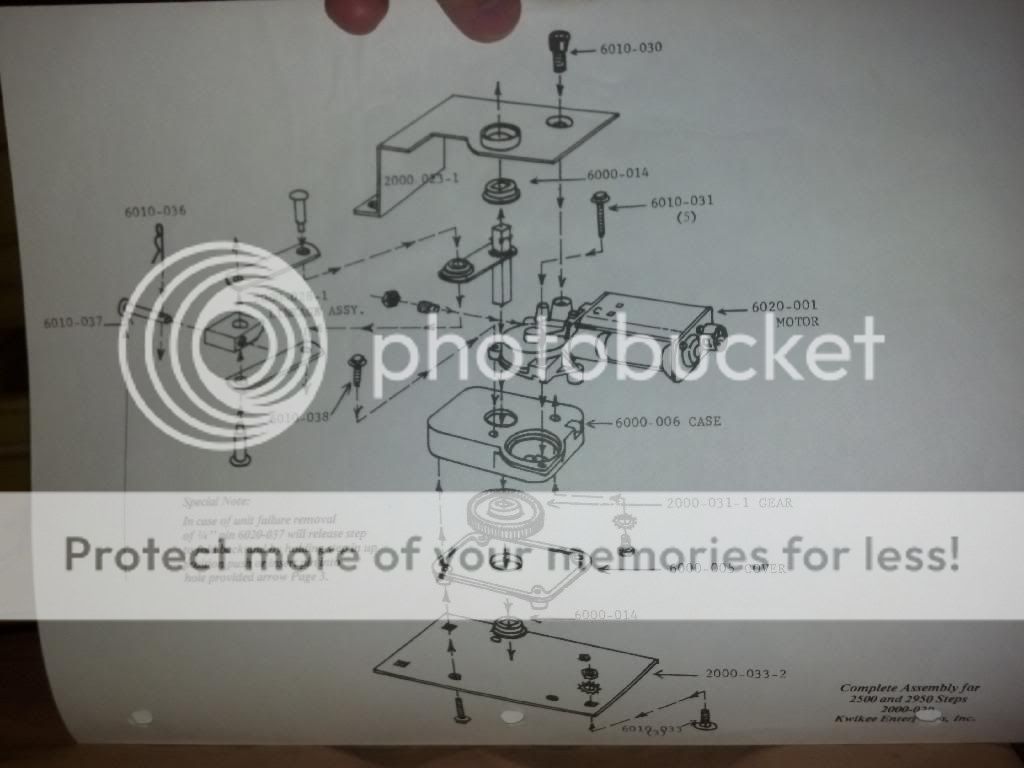 |
| Motor Assembly Diagram |
Lubrication
Almost every guide I've read on the steps recommends lubricating the joints, and everyone has a different opinion on what to use. Kwikee sells their own branded lube, but you pay a huge premium for a of bottle of spray grease that I'm sure is nothing special (I mentioned I'm a cheap SOB). I've read recommendations for motorcycle chain lube, dry lube for RV slide outs, silicone spray, and garage door lube. I ended up using a spray white lithium grease. Don't use WD-40 or penetrating oil. They will just dry up. In my case lubrication did not help much.Motor replacement

The replacement units do not include the gear assembly shown in the picture. (Note: The gear assembly simply pulls straight up to remove. It seals in quite well and can be difficult to get out.)
The gear housing attached to the motor was modified by Kwikee. See the comparison picture bellow. The part number cast inside is the same on both units. They removed two of the mounting pillars and ground them flat. The right mounting hole was drilled through, the bottom mounting hole was tapped, and a hole was drilled in the indentation at the top of the housing.
 |
| Kwikee modified on left. Stock on right. |

Rather than trying to modify the gear housing on the replacement motor I decided that swap the housing from my old motor to the replacement motor. Remove the three long screws at the back of the motor and the housing slides right off. I ended up getting a replacement motor off of a 1979 Buick LeSabre from the junkyard. The gear housing from this car is slightly different but since I was swapping the housing all I needed was the motor which was identical.
While you in there make sure to grease everything well. I didn't get a picture, but the 30 year old grease was completely dried out and more sludge than lubricant.s
Control Module
Replacing the motor on my unit made a big difference, however the step still would not retract completely. So, I started looking at the control module. Opening it up I found the typical relays you would expect. The contacts on one of the relays had quite a bit of carbon buildup from years of use. I cleaned up the contacts with some sandpaper and reinstalled it. Success! Now, the step finally moved all the way through it's motion.


"Remanufactured" Window Motors
If you get a remanufactured window motor pay very close attention to what you are getting. Supposedly these parts are completely rebuilt with refreshed magnets, and the internals are replaced. I went to my local auto parts store and picked a part manufactured by Cardone. Since I was swapping the head unit I had to open it up only to find the inside was completely rusted and it still had burnt wires! It looked like their rebuild process was to slap a coat of spray paint on the outside. Caveat emptor!

Resources
Kwikee Service Manual - The manual covers a a large range of Kwikee steps. Most of the information is on the newer style motor and controller, but it does include basic specs on the older models.Kwikee Steps model 2500-8300 manual - A collection of pictures of the original install / troubleshooting manual. The quality is not the best, but there is a lot of good information
GM Power Window Motor Lifts - Nice forum posting with historical and part number information on GM power window motors.
No comments:
Post a Comment